In this clinical case, techniques will be illustrated that can make crown removal, extractions, and grafting more simple, predictable, and efficient procedures, regardless of overall extraction and grafting experience.
The patient in this case presented with a nonrestorable, root canal-treated mandibular molar tooth (figures 1-3). After patient consultation, it was decided that the tooth would be extracted and grafted in preparation for a dental implant.
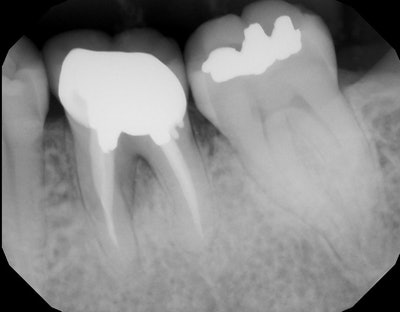 Figure 1: Preoperative digital radiograph of a nonrestorable mandibular molar. All images courtesy of Dr. Timothy Kosinski.
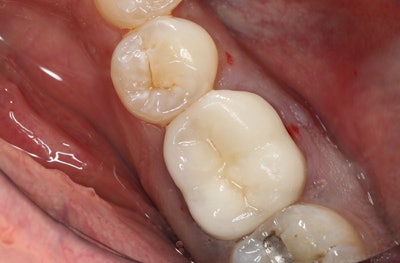 Figures 2 and 3: The crowned tooth is to be extracted, and the site prepared for future dental implant placement.
Since the roots were divergent and it was a mandibular molar tooth where the bone is more dense, the treatment plan included the following:
- The crown would be removed.
- The tooth would then be sectioned and extracted as individual roots.
- The site would then be grafted with a simple technique in preparation for a future dental implant.
For many practitioners without the proper training, extractions and grafting can be difficult. Many dentists do not provide grafting procedures to their patients for reasons that include the inability to effectively place a membrane, lack of knowledge on different materials and when to use certain materials, and others.
 Timothy Kosinski, DDS.
In my experience, many dentists do not understand each product and its uses, or do not protect the graft with a proper membrane and maintain it with proper surgical and suturing techniques.
The technique shown in this case does not require the use of a membrane. The product is simply placed into the atraumatic extraction site. In my experience, it will predictably grow bone, including bone adequate for implant placement. It is important to note that the extraction site must have its walls intact and does not have a defect. This technique should not be used when one or more walls are missing.
So how does one create ideal positioning and angulation of dental implants? Careful planning and design are critical. Understanding tooth position of the eventual prosthesis is important. Once this has been completed, the experienced practitioner can use these techniques to maximize implant position.
A more modern approach is to use cone-beam CT analysis. We use Vatech America's Green CT system in my practice, which has a minimal 5.9-sec radiation exposure. This allows analysis of the existing bone including height and width, anatomic restrictions (such as the maxillary sinuses and mandibular nerves), and virtual placement of dental implants in the available sites. At this time, the practitioner can determine the type of prosthesis that is possible. All this is completed before any surgical intervention.
In addition, we use DEXIS for digital radiographs and the 3M True Definition scanner for digital impressions.
Step 1
The crown is removed from the tooth. I have historically cut or split crowns with a bur in a high-speed handpiece. This technique can be time-consuming and can put wear on your handpiece while using several expensive burs.
However, I am uncomfortable with pulling-type devices that have a risk of fracturing the tooth. In general, when a crown or bridge needs to be removed, we have to physically destroy the porcelain or porcelain fused to metal (PFM). Monolithic zirconia crowns create an entirely different problem. Sectioning the crown can result in damage to the underlying tooth structure and, depending on the forces used, can affect the periodontal health of the tooth.
A product I recently evaluated, the WAMkey (Golden Dental Solutions), has changed how I approach the removal of crowns and bridges (figure 4). The Wamkey Intro Kit contains three keys in oval-shaped heads: sizes small, medium, and large.
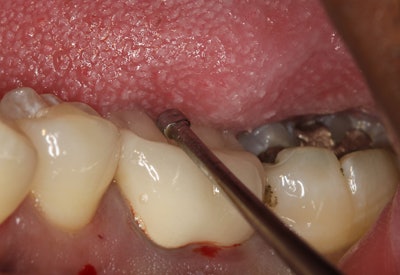 Figure 4: The WAMkey crown remover is used to remove the crown before the tooth can be sectioned.
The technique is relatively simple.
- Create a small window in the crown that is approximately 1 mm to 2 mm in diameter where the preparation/crown occlusal interface is assumed to be located (figure 5). The opening should be made closer to the occlusal surface for metal crowns and generally about halfway between the occlusal surface and the margin for porcelain or PFM crowns.
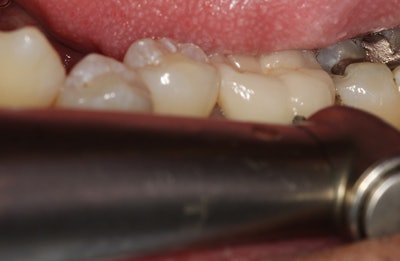 Figure 5: A small opening or “window” is made on the buccal side of the tooth, where the goal of such window is to identify where the cement layer is between the crown and the tooth.
- Locate the crown occlusal interface. In most cases, the interface is located in the previous step, but, if not, the opening made in step 1 would have to be progressively enlarged until the cement seal becomes visible. Visual assistance devices such as surgical loupes or a microscope can be extremely helpful in this process. It is critical that you are working in the cement layer.
- Create a tunnel between the preparation's occlusal surface and the inner side of the crown (figure 6). Using a cylindrical bur (approximately 1.2 mm in diameter is recommended), an oval-shaped tunnel between the preparation's occlusal surface and the inner side of the crown is made. The difference in hardness between the dentin and the crown's structure will help the dentist ascertain the bur's position with regard to the dentine.
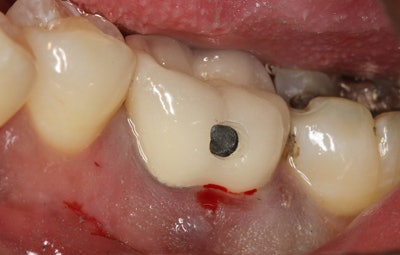 Figure 6: Once the position is located by feel or using loupes, the channel should extend into the center of the cement layer as it is best to leverage from the center of the preparation or on the long axis of the tooth.
- Insert WAMkey into the tunnel and rotate with fingers to loosen the crown (figures 7 and 8). Simply insert the key all the way to the end of the tunnel drilled in step 3 and rotate it with a quarter turn with your fingers. If the tunnel was properly drilled, this movement should occur in the long axis of the preparation. Once the crown or bridge is removed (figure 9), it can be used as a temporary or placed permanently if so desired.
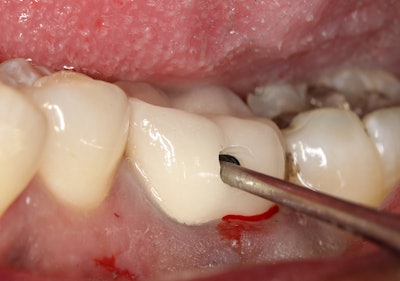 Figure 7 (above): The WAMkey #1, the smallest size instrument in terms of head size, is inserted into the opening. The head of the instrument lays flat when inserted into the crown. Once the instrument has been inserted the instrument is simply turned a quarter turn with your fingertips, allowing the instrument head to stand upward and to gently break or release the cement layer, as well as the crown to be removed in an efficient manner. Figure 8 (below): This image shows that the crown is completely preserved, and it makes for a great temporary or it can even be reused on a permanent basis.
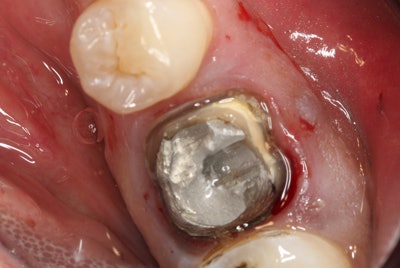 Figure 9: Using a surgical bur, the lower molar is sectioned into two roots, where now the tooth can be extracted as two individual roots.
The next part of this case report series will examine steps 2 and 3 of the treatment.
Timothy Kosinski, DDS, is in private practice in Bingham Farms, MI, and is an affiliate adjunct clinical professor at the University of Detroit Mercy School of Dentistry. He can be reached at [email protected].
The comments and observations expressed herein do not necessarily reflect the opinions of DrBicuspid.com, nor should they be construed as an endorsement or admonishment of any particular idea, vendor, or organization.
